
Route your applications
Choose application rules, notification effects and media markers.
On this page
Give each application a destination, a color and a lifetime. Start with one rule you can recognize, then add reinforcements.
Demo rule, Demo all and toolbar Preview play on screen; they also drive the real strip whenever lighting is enabled. Try examples is always local-only.
Add an application
Open Rules. You have two starting paths:
Try taskbar suggestions
Examples reads Plasma's pinned launchers and desktop-entry metadata. Communication and productivity apps are initially selected; you can include other pins.
- Choose the applications you want to try and a display for their initial destination.
- Select Try examples to cycle through them locally. The status bar names the current app. This does not add rules, launch applications or send pixels.
- Select Add selected to add only missing explicit rules in one undoable edit. Existing rules and the fallback stay intact.
Examples last three seconds, without media or critical emphasis. New rules take the icon's dominant color, or a category color; saved colors stay unchanged. Collapse Examples, or use Settings → Hide demo content to hide it and stop playback.
Use an observed or exact application ID
Select Add app, then choose a recently observed source or enter its exact Application ID and press Enter or the create-rule + control. Let the application emit a normal desktop notification if you need its observed identity to appear.
Launcher names can differ from notification identities. Matching uses the canonical desktop-entry prefix before the app name and is exact, ignoring ASCII case. Choose an observed ID rather than guessing or stripping a legitimate .desktop suffix.
All other apps is the * fallback. With no rules, Use a simple default creates it. An explicit rule that is disabled or rejects a trigger suppresses fallback for that application; fallback is not a second chance after a filtered rule.
Place the signal
- Select the application's tile to edit it. The separate power icon turns the rule on or off; selecting a tile does not toggle it.
- Click a room display to assign the rule to it. By default, the marker follows that display's mapping to the strip.
- To choose a fixed device LED, drag the round marker along the strip in either the room or the bottom LED view. Use contextual Position for an exact index.
- Use the display icon to return to following the assigned display.
Both views show the same anchor. Explicit LED positions survive geometry, allocation and direction changes; changing LED count scales them proportionally. Removing a display redirects its rules to the first remaining display, so review those destinations afterward.
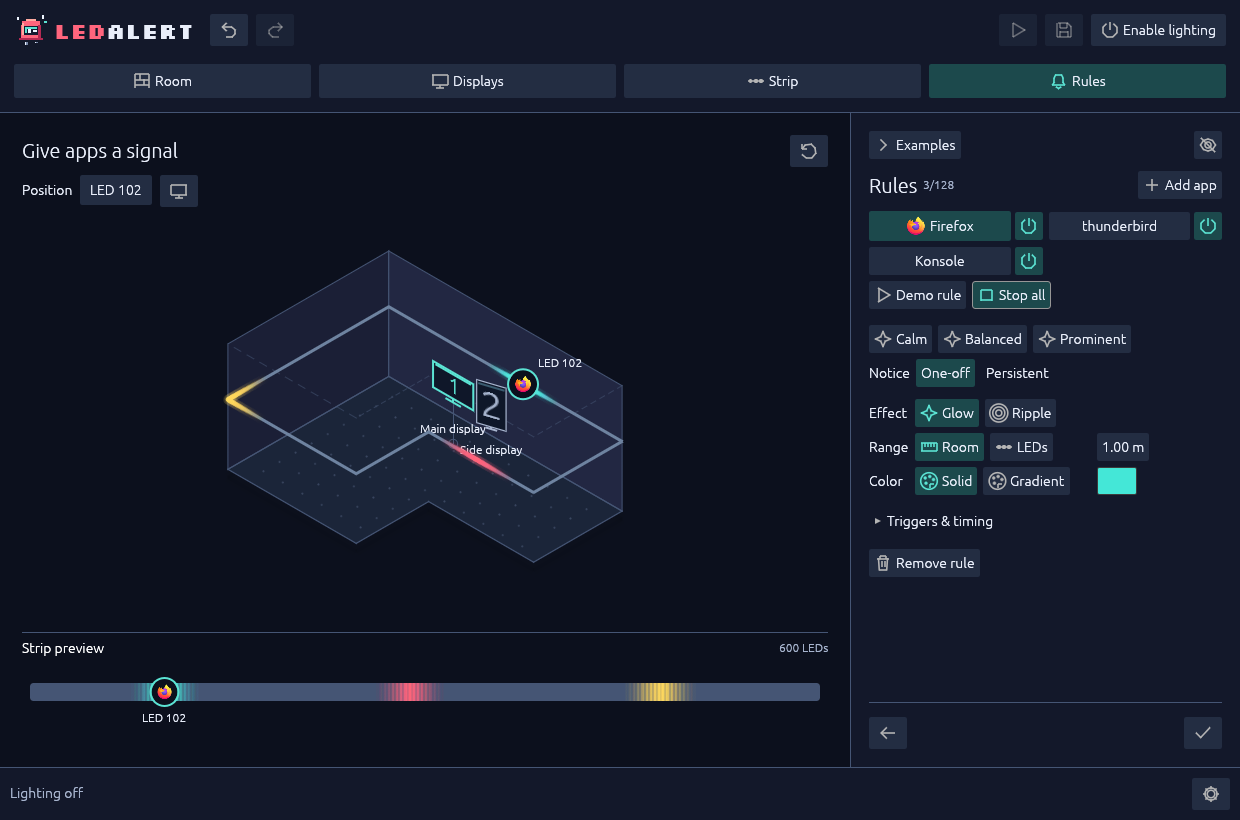
Give each application a destination and an effect.
Choose the lifetime first
| Choice | When the indication ends |
|---|---|
| One-off | After its finite duration. Selecting this mode enables fading. |
| Persistent | When the desktop explicitly dismisses/closes the notification, or you dismiss its light in LedAlert. Popup timeout alone does not clear it. |
Scene Dismiss clears the selected rule's persistent lights; the toolbar dismissal counter clears all. Neither dismisses desktop notifications. Persistent lights are not restored after restarting LedAlert.
Shape the effect
Calm, Balanced and Prominent set duration, reach and intensity while keeping the application, triggers and color. Refine from there:
- Glow gives a centered indication; Ripple adds one outward band. Effects do not repeat or strobe. A persistent ripple enters once over a steady marker.
- Room range uses three-dimensional distance from the anchor LED. LEDs range uses device-index steps, independent of drawing scale. Both extend outward on either side of the anchor.
- Solid uses one color. Gradient uses two to eight stops from the center to the outer range. Endpoints stay at 0% and 100%; intermediate stops can move or be removed.
- Triggers & timing exposes Notifications, Media, minimum Urgency, Critical accent, Duration or Entrance, Intensity, and Fade in and out.
For a steady finite indication, choose One-off → Glow and clear Fade in and out. Settings → Reduced motion takes precedence over fades and ripples, substituting steady indications without changing their lifetime. Playback markers remain steady.
Overlapping signals add RGB contributions before a shared per-LED brightness limit. Red and blue can mix toward magenta; dismissing one signal leaves the other.
Preview on screen
- Use Demo rule to inspect the selected rule's position and appearance. One-off demos expire; persistent demos toggle off with the same button. Selecting another rule stops them.
- Use Demo all to start eligible notification rules together, including an explicit fallback. Disabled or notification-filtered rules do not play. Toggle it off, select a single rule, or leave/hide the Rules sidebar to stop persistent demos.
- Select Finish to save a valid setup. In the finished view, toolbar Preview cycles eligible rules in shuffled order with random 1–5 second gaps. Click it again, press Esc or select a rule to stop.
Stopping a demo never dismisses a real notification; configuration edits, lock/quiet inhibition, output faults and guidance stop demos, and recovery does not restart them. Changing lighting enablement clears them too.
On-screen colors are lifted so low-brightness signals remain visible; they do not predict measured room brightness.
When you choose to move beyond preview, follow the explicit lighting-permission steps. Check Settings → Desktop notifications and the rule's Notifications trigger and urgency filter. Only supported desktop notifications are observed; in-app messages and other transports do not automatically qualify.
For a playback marker, enable Settings → Media playback and the rule's Media trigger. The application must expose participating MPRIS playback state; notification support does not imply media support. LedAlert does not capture audio or read track metadata.
If a demo works but a real event does not, start with notification troubleshooting. See rule behavior for coalescing and capacity limits.
Next: Everyday controls.