
Map your strip
Trace one WLED RGB strip, set its direction and understand LED allocation.
On this page
The drawing says where the strip runs. LED allocation says which physical LED belongs at each bend. Get those two maps aligned before asking the photons to report for duty.
You can edit the path without connecting hardware. Connect reads a device; it does not send pixels. Guide with real lights is different: it requests temporary control of the entire strip.
Connect read-only
Use a configured WLED RGB device on a trusted local network:
- Open Strip.
- Replace WLED IPv4 address with your device's private LAN or link-local IPv4 address. The initial
127.0.0.1is local loopback, not a discovered strip. - Select Connect. LedAlert reads the LED count, WLED version and realtime state without changing settings or sending pixels.
- Review the reported count. A changed count disarms output and requires allocation review; connecting is not permission to light.
If Another realtime source is active appears, stop that controller through its own controls, then reconnect. LedAlert refuses takeover; WLED HTTP/DDP has no authenticated, exclusive ownership.
Allow HTTP 80 for the JSON API and UDP 4048 for DDP. A read-only connection checks HTTP, not physical light or UDP delivery.
Choose or replace the route
Starting placements are shortcuts, not a continuing attachment to the walls:
- Around room replaces the strip with the current room perimeter.
- Along walls lets you click adjacent walls in the order followed by the real strip. Click the last wall again, or use the undo-wall control, to remove it from the selection. Select Place strip to apply that ordered route.
- To keep the current path, close placement controls without applying a route and edit its points directly.
Placement controls disappear after applying a route or editing the path; reopen them with Starting placements.
Replacing a route resets LED allocation and direction. Review both, or use Undo to restore the previous path and allocation. Changing only the room outline preserves the strip instead.
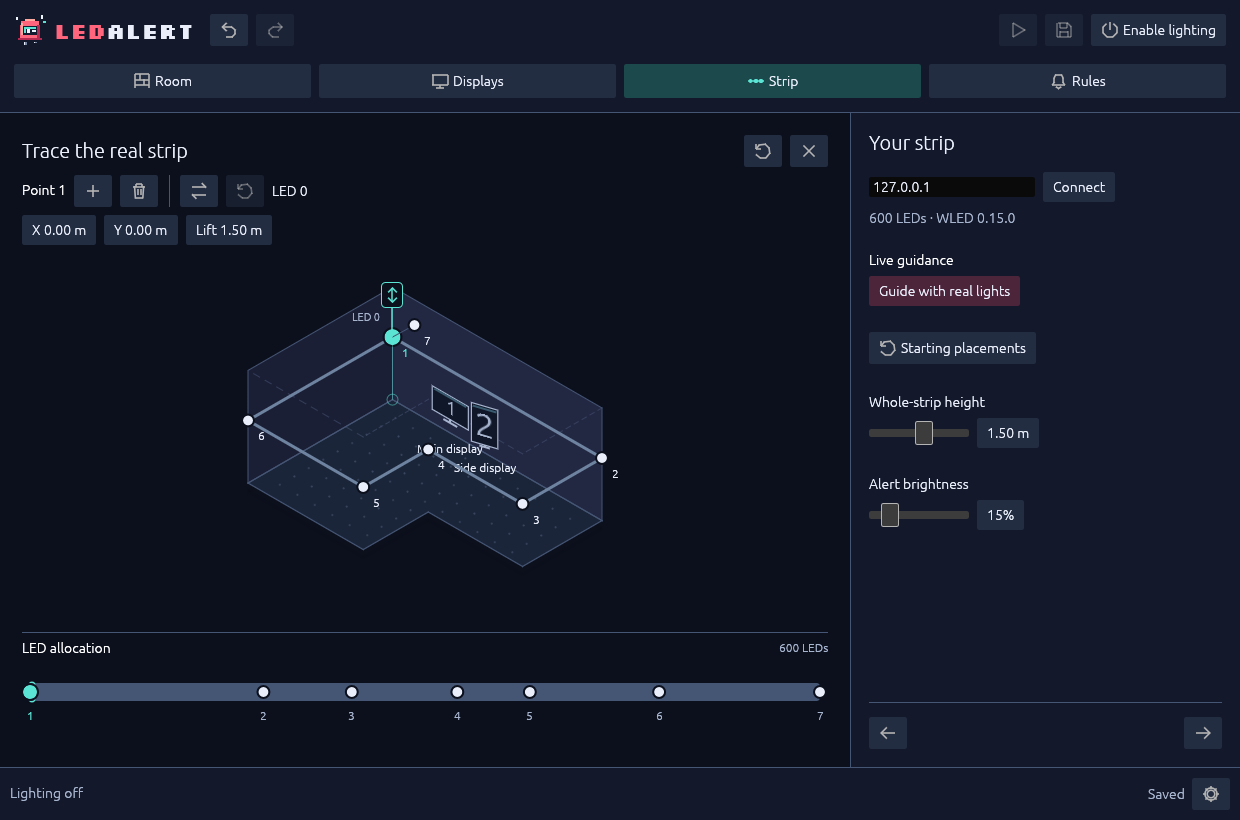
Match the room path to device indices on the LED rail.
Trace bends and height
- Select a strip point or a span in the room. Contextual tools appear above the scene.
- Drag a point along the floor, or enter its X / Y coordinates, to place it.
- Use the point's graphical lift handle or Lift field to move only that point vertically.
- Use + or double-click a span to insert a bend. Use the trash action or Delete to remove a selected point when allowed.
- To raise or lower the entire route, use Whole-strip height in the sidebar. It moves every point together while keeping relative heights.
Keep 2–64 points, at least 1 cm apart. Every complete span must fit inside the footprint, including around concave corners. Resolve red conflicts before saving; see room conflict recovery.
If inserting a bend is unavailable in by-point allocation, there may be no unused LED index between the neighbouring anchors. Move the allocation handles apart before adding a point there.
Match the LED order
Initially, proportional allocation samples the path with uniform physical spacing. Longer spans receive more LEDs. If that differs from the installed strip:
- Find the numbered handles on the bottom LED rail.
- Drag an interior handle to the actual device index at that bend. The first real drag converts proportional positions to explicit point indices without moving the path.
- Keep interior indices ordered. The endpoints are fixed to the strip ends.
- Use the direction-reversal control above the scene if LED 0 belongs at the other endpoint.
The rail displays actual device indices, including after reversal. By-point allocation interpolates between each pair of anchors; it does not move the room geometry. The proportional-reset control returns to uniform spacing along the path.
Review the start/end indices, allocation and reversal after adding/removing points, replacing the route or connecting a different LED count. Explicit rule positions stay tied to device LEDs through geometry/allocation/direction changes and scale proportionally when the count changes.
Optional: identify physical LEDs
Guidance controls the entire real strip: steady white in the selected area, darkness elsewhere. It suspends ordinary alerts and does not re-enable them afterward.
- Connect the intended strip. Ensure the session is unlocked, Quiet mode is off and no other realtime controller is active.
- Select a point or span, then Guide with real lights.
- Read the address and LED count in the consent dialog. Choose Take control only if this is the device you intend to operate.
- Compare the physical highlight with the drawing. A point highlights its mapped LED and up to two neighbours on either side; a span highlights the interval between its endpoints. Allocation edits move the highlight immediately.
- End the session with Stop, Stop guidance or Esc.
Sessions last at most two minutes, with RGB channels capped at 25/255. Extend asks for consent again; permission is never saved. There is no flashing or persistent WLED settings change. The cap does not measure electrical power or light output.
Leaving Strip, undo/redo, target changes, invalid selection, quiet/lock inhibition, producer stalls or transport failures end guidance. Recovery never restarts it. Geometry and allocation remain editable during guidance.
Stopping asks WLED to leave realtime mode; its own effect may resume. Failed release stays visible and blocks acquisition until a read-only check finds the previous device no longer live. Crash or network-loss recovery depends on WLED's configured realtime timeout.
Save before routing alerts
Use Ctrl+S to save a valid map. Finish also saves and opens the finished view; it does not grant lighting permission.
Next: Create rules. If connection, allocation or release fails, use troubleshooting. The transport reference covers precise packet and failure limits.